How to Use Digital Sewing Patterns

Sew Liberated’s digital patterns come with an instructions file and a couple options for printing the full-size pattern pieces.
The first option for printing the pattern pieces is to send the “PRINT-SHOP” large-format PDF formats to a commercial print shop. The alternative is to print the “PRINT-AT-HOME” PDF yourself, assembling the smaller pages together with tape or a glue stick.
Print Shop (Large Format Printing)
If you get your pattern printed at a local copy shop, ask about the cost first, so you aren’t surprised later. Ask them to print at 100% with no scaling or tiling. You should use the test square on the pattern page to check their work.
For a reliably less-expensive option, please consider getting your digital pattern printed through EWE Fibers, Patternsy, Spool & Spindle or Sew YYC instead! EWE Fibers is in the US, Patternsy is in the UK and ships to the US and internationally, and SewYYC is in Canada.
Our most recent patterns include colored sizing lines and the ability to print only the sizes you need. (We recommend printing at least three sizes, so you can make sizing adjustments. More details on this below.)
To place an order, you’ll first need to download the “PRINT-SHOP” digital pattern file.
Then, determine the size and number of the pages you will be printing. All of Sew Liberated’s “PRINT-SHOP” PDF files are either the standard A0 or A1 size, or a 36”-wide version. The page size is stated in the pattern’s file name, for example, the “PRINT-SHOP-Lichen-A0” PDF is A0-sized. The page size is also specified at the beginning of the pattern instructions.
Finally, you will place your order and upload the “PRINT-SHOP” file to whichever print shop you choose.
Let us know at support@sewliberated.com if you have any questions or run into problems.
Print at Home Option
Download your PRINT-AT-HOME file and open it using the free Adobe Reader program (download here.) Opening your file in your browser’s default program can result in scaling issues! Make sure to select “Actual Size” , and DO NOT SELECT “Fit”.
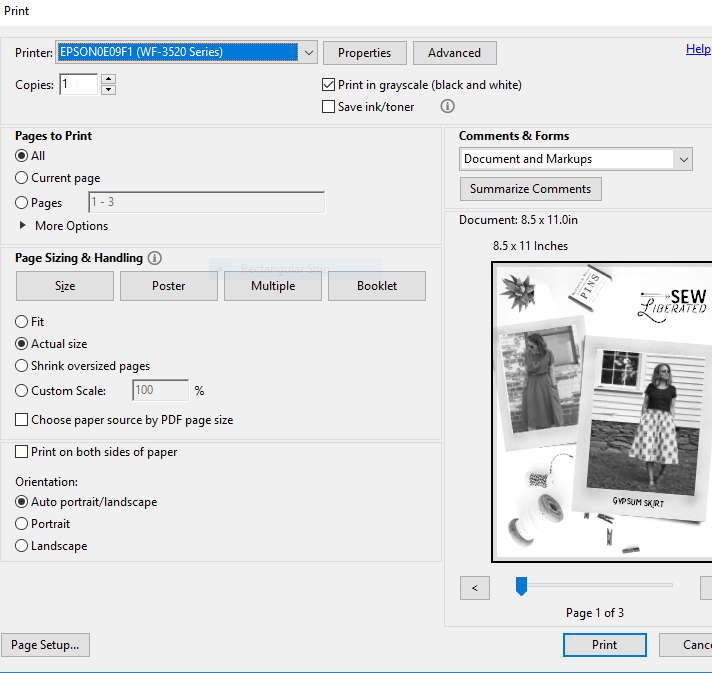
Print the first page of the PRINT-AT-HOME file at 100% with no page scaling, and measure the test box. If it is not the right size, adjust your printer settings, in particular being sure that ‘Page Scaling’ is set to ‘None’.
Once you have the correct page scaling, print the entire PRINT-AT-HOME file.
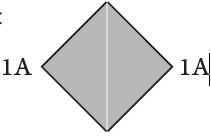
To assemble, line up the labeled diamonds as shown above.
Fold back or cut one page’s margin and slide the other page behind it. You can tape or use a glue stick to affix the pattern pages to one another.
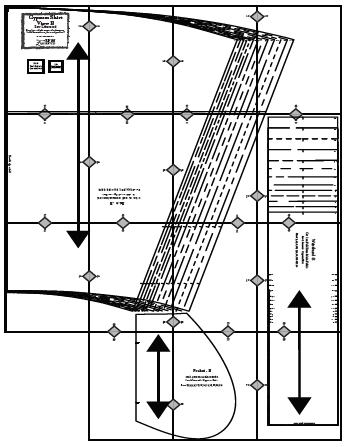
Your assembled pattern sheet should look like a big version of the diagram to the right:
Advanced: Printing Only Specific Sizes
Beginning with the Lichen Duster, our pattern piece PDFs are layered, so you can print only the sizes you need. This is a slightly advanced technique that helps to cut down on the number of lines on your pattern sheets, making it easier to see the lines for your size.
We highly recommend always including at least the size above and below your target size, so you can more easily make sizing adjustments as you fit your garment to your body. If your measurements don’t fall within a single size (which is very common!), be sure to print a range of sizes that covers all parts of your body. For example, if you are a 22 in the hips but a 26 in the bust, we recommend that you print out sizes 20 – 28.
If you would like to print particular sizes in large-format sheets, EWE Fibers, Patternsy, Spool & Spindle or SewYYC can do that for you.
If you would like to print particular sizes at home, you can hide other sizes in the PRINT-AT-HOME PDF using the layers feature of Adobe Reader on a Windows PC or Mac laptop/desktop. (Unfortunately, working with layers is not currently well-supported on mobile devices.)
The layers tool is in the sidebar and looks like this:

If you have any other suggestions on how to best print PDF patterns, let everyone know in the comments below! And of course, if you need any extra help, please don’t hesitate to write us at support@sewliberated.com. We’re here for you!


Hi there, I have the areninte pattern and was wondering if it was possible yet to print only the layers/sizes needed and if not, is this something you will be offering on older patterns in future? Thanks!
Madeleine, thank you for the question!
We are working on a larger update to the Arenite Pants pattern, which will size it up to size 34 and add size layers to the pattern piece files. (We are committed to offering size layers on all new patterns, and we are gradually updating existing patterns.) Everyone who has ordered the Arenite Pants sewing pattern from us will automatically receive this update. I don’t have a fixed timeline, because we need to test out the size expansion, but I expect it over the next 6 months.
Hello, I live in Ireland and I found a great place to print the patterns for me – Crafty Studio in Dublin (craftystudio.ie). Great customer service and not expensive. For 3 patterns (8 pages) it cost €24.00.
Hi, do the seam allowances need to be added to the pattern? Thanks
Hi Anwen! No, our patterns all include the seam allowances in the pattern pieces.
Is there a tutorial for the Hinterland Dress without the front placket? I’m new to this and haven’t used a digital pattern before, so a bit afraid to start! Should I cut the received printed pattern to my size (don’t have tissue to copy it to and would be worried that I wouldn’t be accurate enough tracing it!)? Ditto not confident enough to do button holes.
Thanks.
I am used to pinning tissue patterns to the fabric. Can I pin the pdf printed pattern pieces to my fabric or will the paper be too thick?
Good question! Did you ever get an answer? I was thinking that the paper would dull my scissors too.
I’m no expert, but I think I can answer this one, having watched Shaerie teach this to Sophia while I was filming the Learn to Sew classes:
You can definitely pin paper pattern pieces to the fabric even if printed on normal paper, which is quite a bit heavier than tissue.
For the scissors, I would recommend having a less precious pair of scissors that are labeled as paper scissors, cutting out the paper pattern pieces first, and using your extra-sharp scissors only when cutting the fabric around the pinned paper pattern pieces.
You could always pin and then trace a chalk outline around the paper pattern to prevent you accidentally cutting the paper with scissors.
For about $3usd per yard you can use a Pattern Ease type product so you don’t have to cut your original pattern. This is a type of interfacing that you can trace your pattern and make adjustments on, re-pin several times. It’s 45″ wide . Pellon makes a similar product
Thank you for the help printing at home. By the way, the link is broken from the Hinterland Dress page.
I am a novice at home-printing patterns, having printed only a few other patterns, and this was my first experience working with layers. Using Adobe Acrobat Reader DC (the free version), I couldn’t find a function to print only some sizes. If I’ve missed something, someone please help me out.
Instead, I used FlexiPDF by Softmaker, a German company whose office suite I’ve been using for many years. Instructions are available in English and other languages. The Pro version allows viewing and printing layers, but what is great, Softmaker allows anyone to use the Pro program for free (at least now in May 2022), but the program adds a small “watermark” with the name of the program. The watermark did not interfere with my use of the pattern. If I end up printing more patterns with layers, I will consider buying the program to support their work. I have no affiliation with Softmaker and am sharing in case there are other sewists who don’t want to subscribe to the paid version of Adobe Acrobat Reader and have already used the one week free trial of Acrobat Pro, maybe to print another pattern with layers 😉
Thank you Cassandra, we think we have fixed the link.
If you are on a laptop running Windows or a Mac, you will be able to hide/show layers in the free Adobe Acrobat Reader DC. (I updated the layers section above to show what the tool looks like.) Unfortunately, I could not find a good free tool on mobile devices for showing/hiding layers.
I’m not sure if there was an update or if it’s different on my computer (Windows), but I found the layers icon on the right hand side. I was able to select the size I wanted and it printed out just fine.
Is a 1/16 of an inch margin of error on the test square okay? My 3 inch test square is 2 15/16″, which does add up on a larger pattern piece, such as a pants leg.
Thank you!
Hm, I don’t really want to say “yes” just yet, so let’s troubleshoot first. Are you measuring with a measuring tape, or a ruler? Measuring tapes can stretch out over time, so that’s one consideration. And are the lines on the measuring tape/ruler really heavy? Because you’re right, tiny little discrepancies add up, so it’s good to be sure. Try double-checking with a different ruler, and possibly try the metric box if you have a ruler with cm :). Let me know what you discover!
Love your patterns! More and more of us are using projectors for cutting out, bypassing paper altogether. I wondered if you would consider including a file optimised for this purpose? There are a bunch of resources out there, but in particular there is a facebook group, “Projectors for sewing”, which has some really comprehensive how-to notes (files) relevant for users and for pattern companies, including a checklist of what makes a pattern file “projector friendly”. It is true that the A0 / large format printer files can be helpful, but there are a few other things that would make a huge difference and mean users don’t need to adjust formatting before cutting. Some users won’t purchase patterns that are not projector friendly now, so it might just grow your customer base. Thanks for your consideration!
Jo, thanks for this prompt. I am so happy to be able to say that, with help from Rachael at Minimalist Machinist, the Bedrock Tee is our first pattern with a projector file! We are hoping projector enthusiasts will try it out and hope to be able to provide updates to our other popular patterns to include one soon.
It’s important to bear in mind that home printers don’t print all the way to the edge of the paper. So if you’re using that option, it’s good to figure out how much of a margin your printer leaves unprinted. You will need to carefully overlap the pages accordingly as you fasten them together. I have found that using a paper cutter, and cutting two edges from each piece helps a lot. My printer prints to about 1/2 inch of the paper’s edge, so I have to overlap each edge of each piece 1/2 inch. Instead, I cut 1/2 inch from the top and left sides of every page. And then tape or glue the pages in order, starting at the top row from left to right, then adding the second row from left to right and so on. If you don’t want to cut two edges like this, you could fold them down. This may sound confusing, and hopefully I’ve explained it in a way that makes sense. Once you’re actually assembling the pieces, I think you’ll understand what I’m saying.
I only want to print the pages necessary for the bodice. Do you offer a chart or schematic that shows the page numbers?
We have this for some patterns, but it’s a great idea for improvement for others. Can you tell me which pattern you are working with?
The Hinterland. I was able to find which pages to print. It was somewhere on your site but I don’t remember where. I think it was mentioned in a blog post.
Any word on when the estuary skirt might be available with an updated pdf to support size layers? I’m planning on printing a new copy of my pattern, but will hold off if it’s coming soon 🙂
Hello! I’m so in love with many of your patterns. Are you considering adding projector files anytime?
Yes, most of our newer patterns now have projector files! Over the next few days, we’ll double-check that the product pages reflect that fact.
hi! I just download the metamorphic dress, is there a projector pattern available for this? thank you
Hi Jillian, we don’t yet have a projector file for the Metamorphic Dress, but I will note that you’re looking for it, so we can try to get that done. Sorry about that!