Hinterland Hack-a-thon: Make a V-neck dress with waist darts, elastic back, and widened sleeves

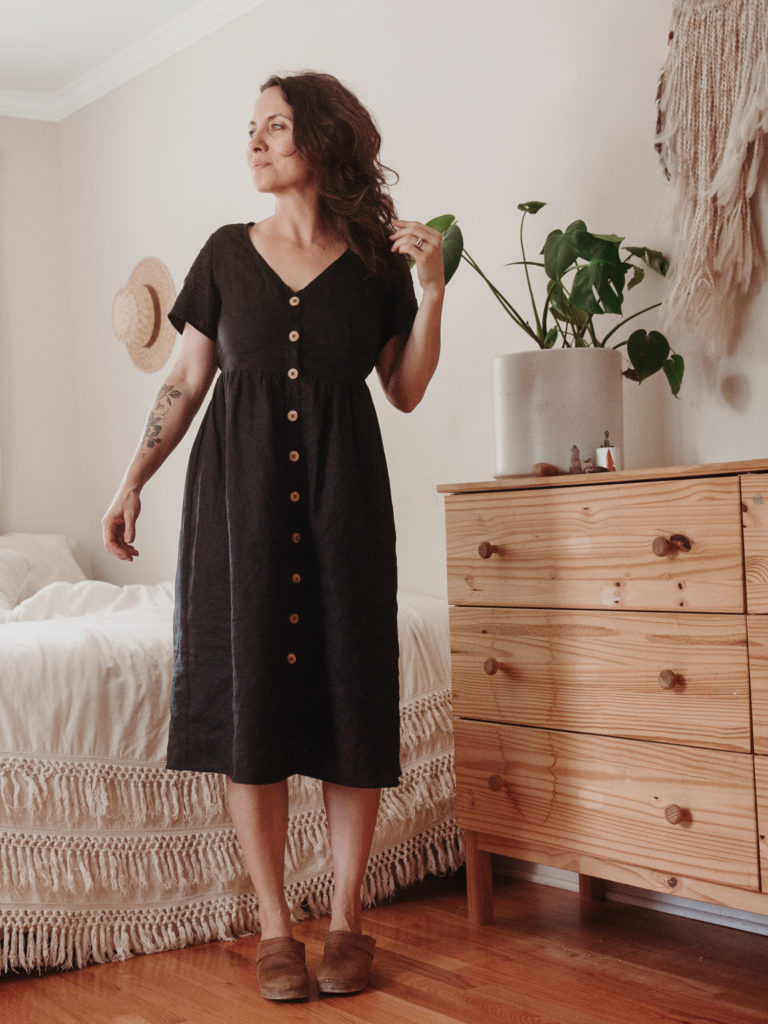
I’ll be frank with you. I saw my friend wearing a similar dress at preschool pickup and I stared quite a long time at bust dart placement and elastic channeling before I said, “I could hack the Hinterland Dress to make that!” Fortunately my friend is also a sewist, and as such, continued to be my friend after the encounter. 😉
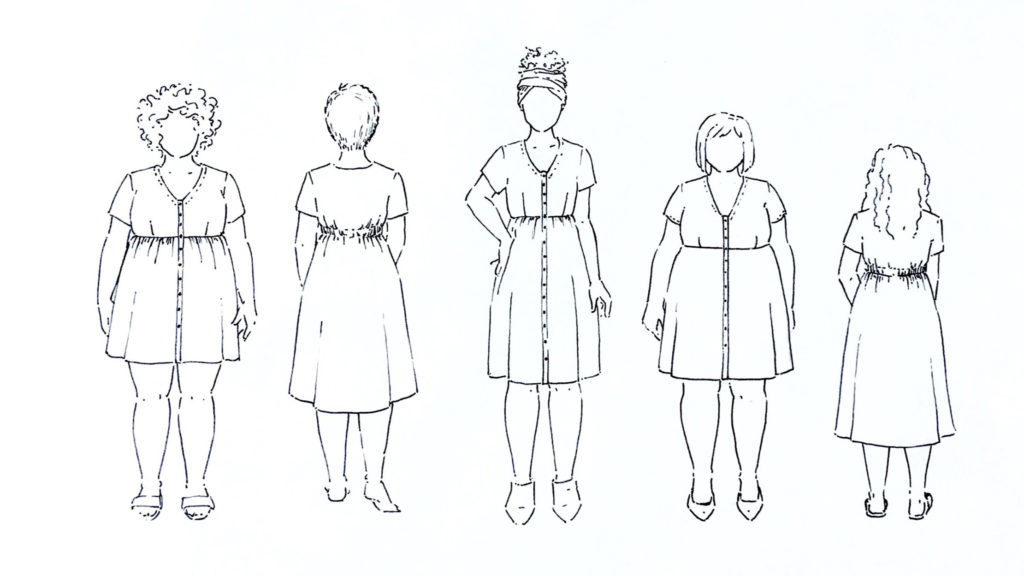
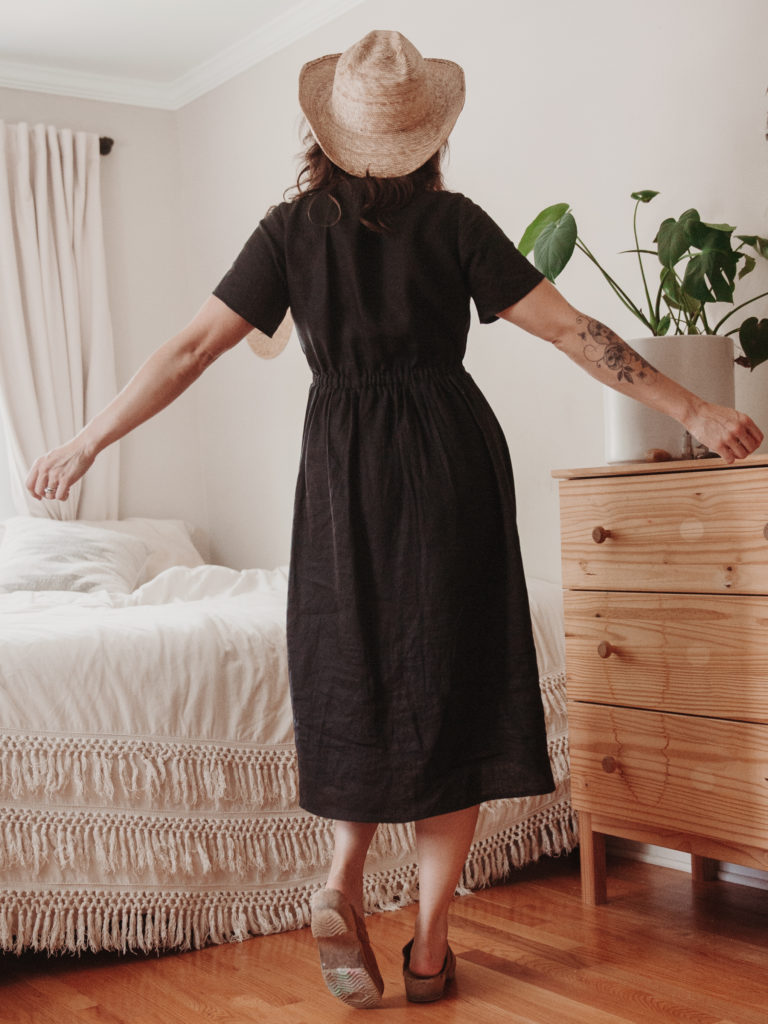
I REALLY love this dress. I plan to take it as one of 9 items of clothing on a three week trip to Europe this summer. Follow along over on Instagram to see how versatile it can be. Because it’s a V-neck, it layers very nicely under other tops, and because it’s black linen, it should be easy to care for and cool to wear. It adds a little “fancy and fitted” to the typical Hinterland silhouette with the help of waist darts and an elastic channel in the back.
You’ll learn a lot about pattern manipulation as you sew your way to a much-loved dress! Be sure to set aside a few hours to trace and hack your pattern pieces. You’ll be changing the position of a bust dart, re-drafting a bias facing and widening and lengthening a sleeve. This isn’t speedy sewing prep, but it isn’t difficult, and I promise you’ll cherish the result. Thank you so much to Judith for putting together this amazing tutorial!
Before you get started, check the fit of the bodice, either by making a quick muslin or doing your usual adjustments. For example, I’ve made the Hinterland dress before and I know that I’ll cut a size 10, and make a small adjustment to the shoulder area. I would do that adjustment now, before I continue with this tutorial.
Don’t have the pattern yet? Grab your downloadable hinterland dress pattern in the shop
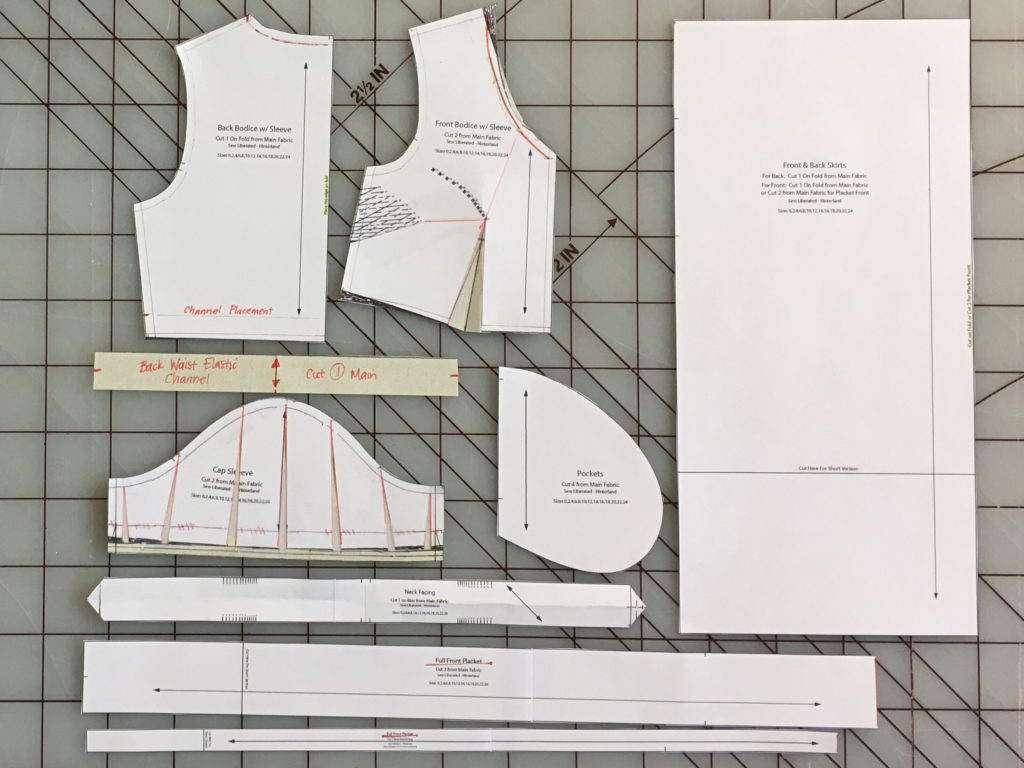
You’ll need to trace off these 8 pattern pieces to start:
Front Bodice w/Sleeve
Back Bodice w/Sleeve
Cap Sleeve
Front and Back Skirt (same pattern piece)
Pockets (optional)
Full Front Placket
Full Front Placket Interfacing
Neck Facing (leave some extra paper on the ends for your adjustments)
You’ll also need some spare pattern paper, clear tape (like Scotch Magic Tape), a ruler (and a curved ruler, if you have one), paper scissors and a sharp pencil.
The corresponding image is shown above the written instructions. Note that the pattern pieces are shown at 1/3 scale.
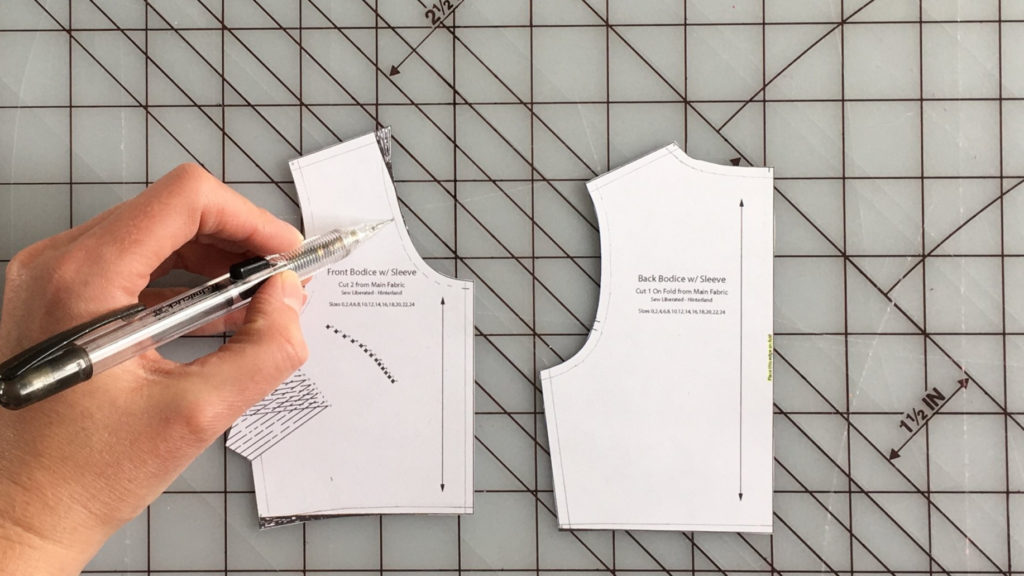
- Draw in the seam allowances on the Front Bodice and Back Bodice neck, shoulder, center front, and waist seams (all ⅝” except the waist, which is ½”), and on the whole Sleeve (⅝”, hem is ¼” plus ¾”). You’re going to be working your adjustments from the seam lines, not the cut edges, so marking these seam allowances accurately is very important.
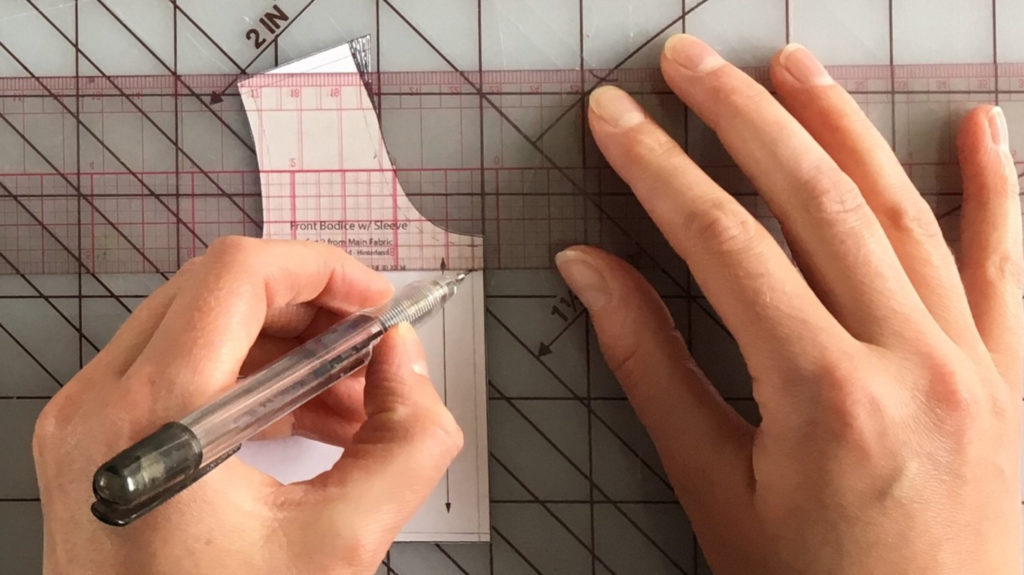
2. On the Front Bodice neckline at Center Front, make a mark ½” down from the neck seam line (or more than ½”, depending on how low you’d like your neckline to go. On the modeled black dress, the neckline was lowered by 2” (5.1 cm). Connect this mark to the original neckline near the shoulder with a gently curved line. If you use a straight line here, it will look very strange on your body. (If you don’t have a curved ruler and you’re not happy with your lines, try using a printable curved ruler. https://www.onthecuttingfloor.com/french-curve-printable-template/ And if you’ll be doing much pattern hacking, I strongly recommend investing in a good set of curved rulers!)
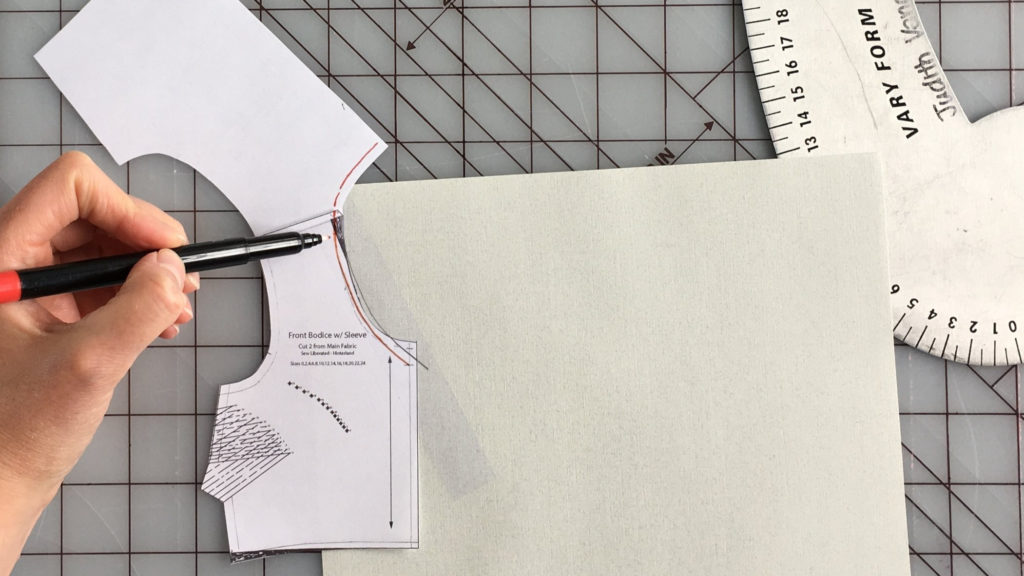
Line up the Back Bodice to the Front Bodice, matching seam lines, along the shoulder seam, and blend the neckline curve to meet the original neckline at the Center Back.
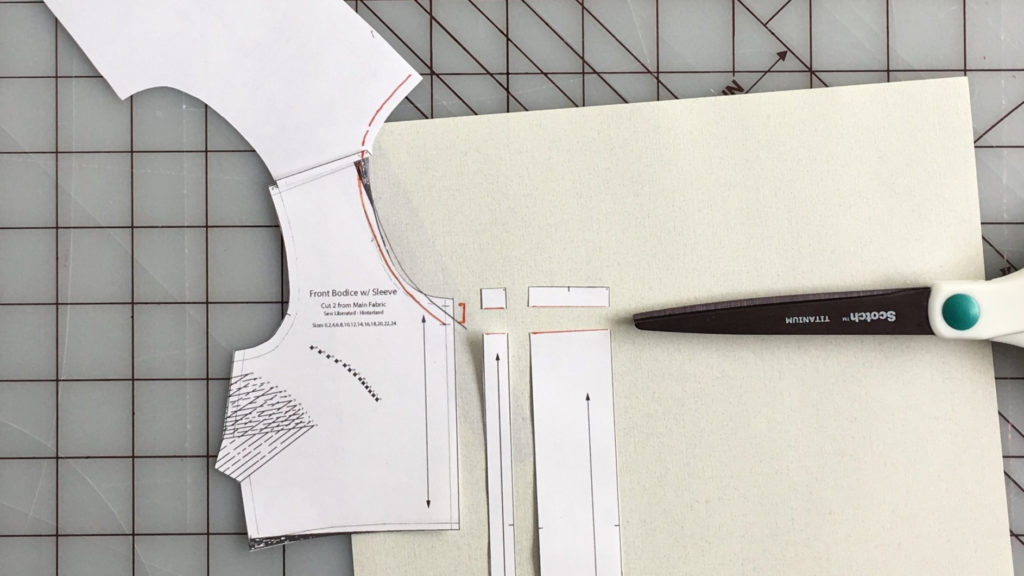
You’ll need to shorten the placket pieces the same amount that you lowered the neckline at the beginning of this step.
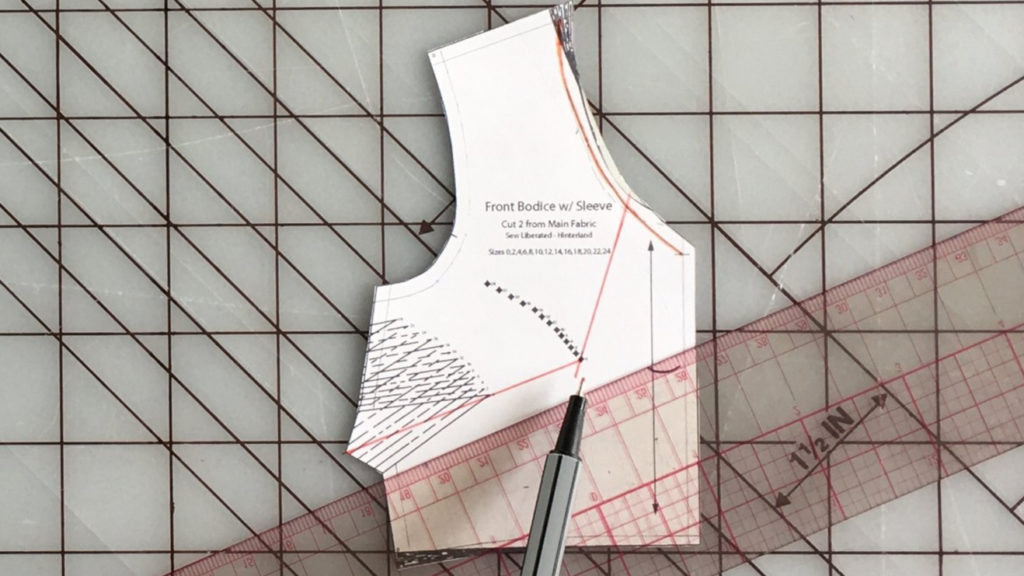
3. To prevent gaping at the front neckline, draw a line from the center of the new neckline to the bust apex. Draw another line through the center of the bust dart to the apex.
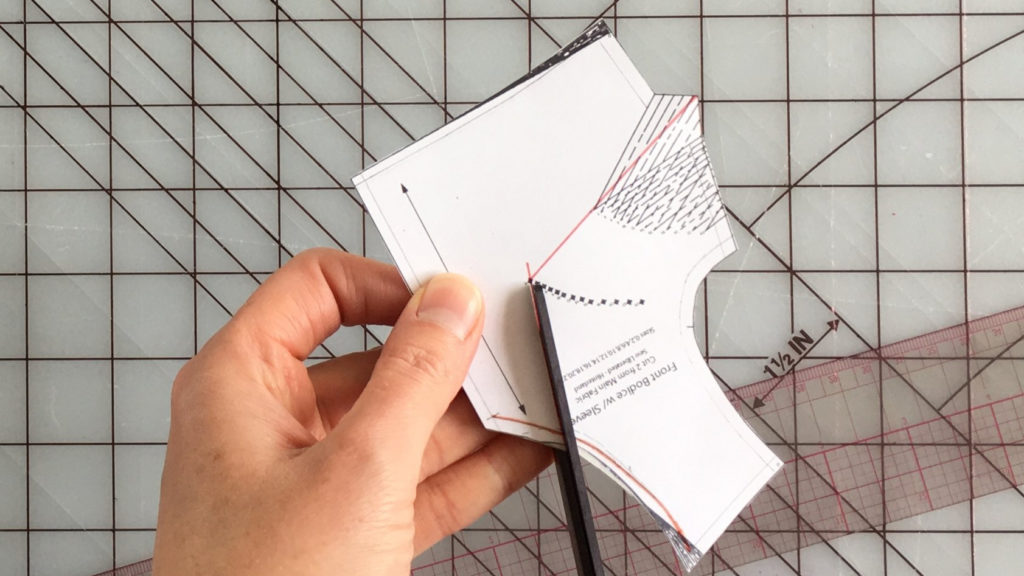
Cut along these two lines, leaving a small hinge of paper connected at the apex, so that you can pivot these pieces. Overlap at the neckline ¼” – this will open up the bust dart slightly. Tape this overlap in place, but don’t tape the bust dart yet.
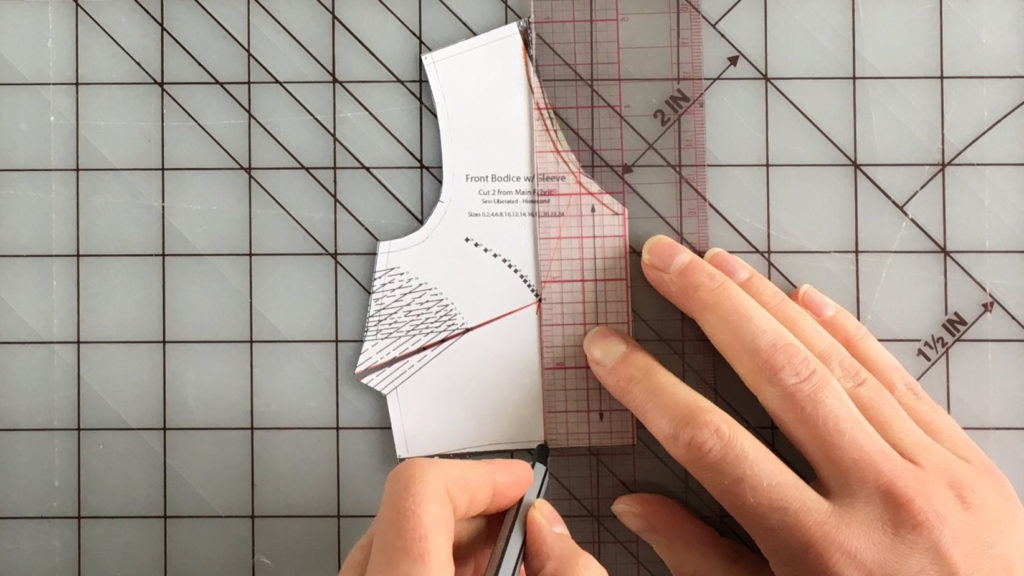
4. Mark a line from the bust apex to the waist, parallel to the grainline. You have already cut open the side dart in the previous step, and now you’re going to close it and make a new waist dart.
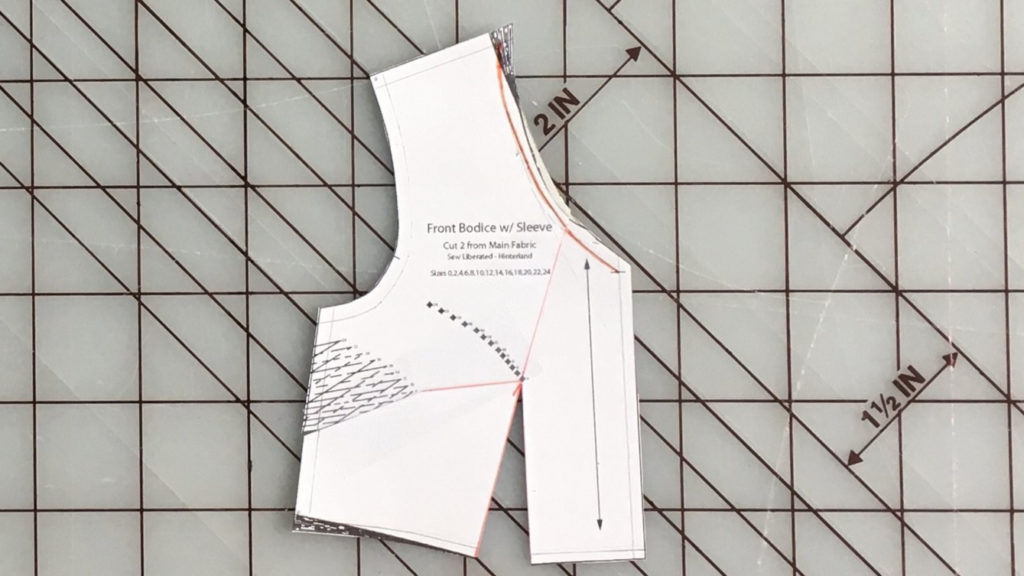
Cut up from the waistline to the bust apex along your new line, leaving a hinge point at the apex. Cut out the side dart intake (the triangle that corresponds to your size) and pivot the lower side of the pattern until the dart is closed. Tape in place. As you do this, the new waist dart will open along the waistline.
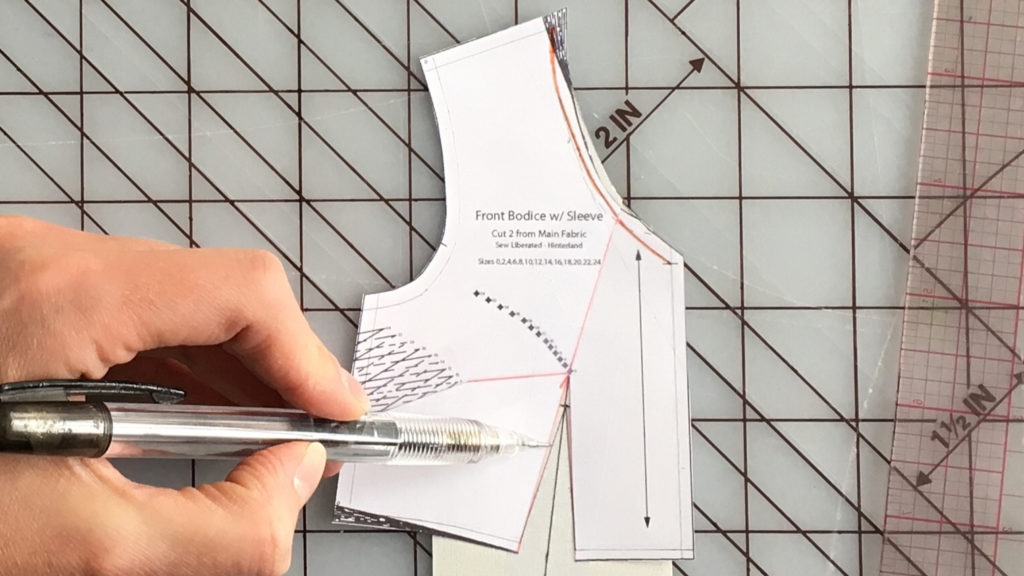
Tape paper behind the open dart. Now mark a new line from the bust apex to the waist, down the center of the dart. Measure 1” down this line from the apex and make a small mark across the line, to mark the end of the sewn dart. Draw in the new dart legs.
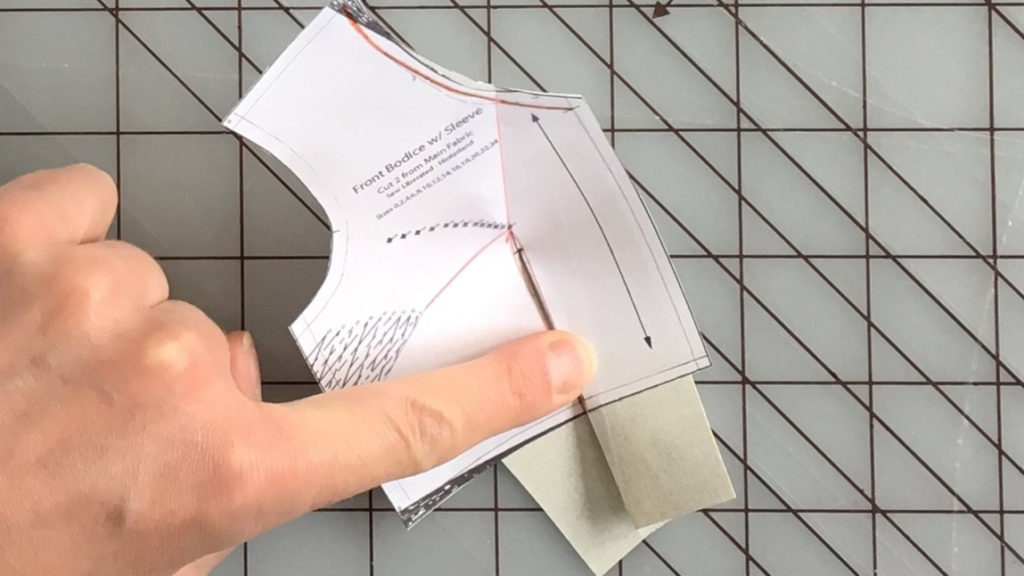
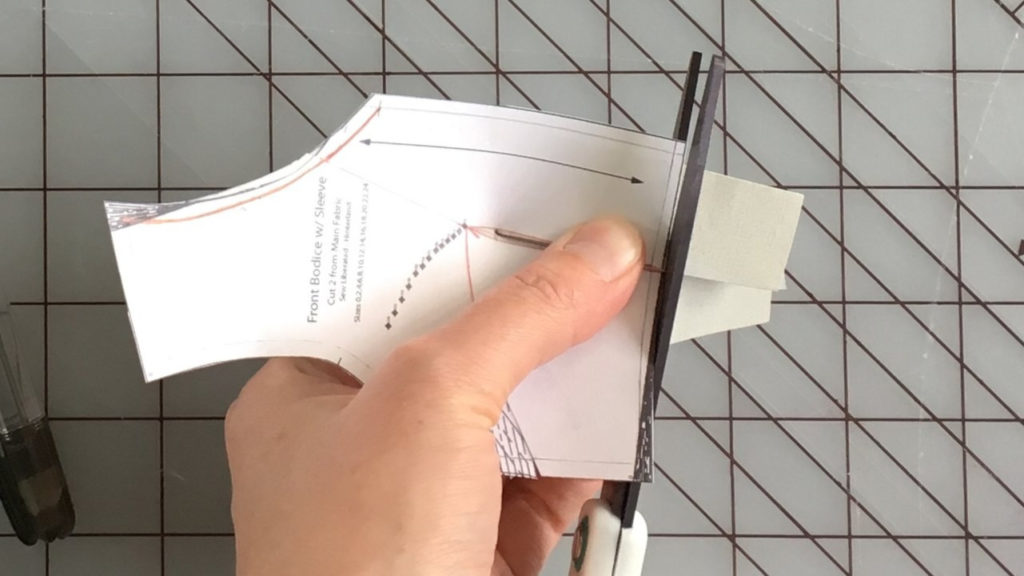
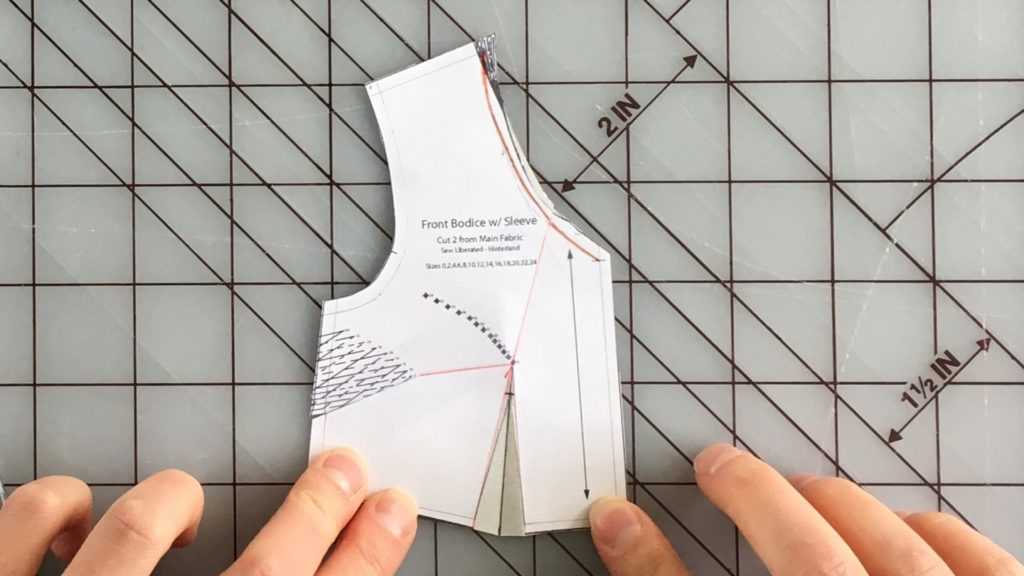
To true up the seam allowance, fold the pattern piece with the dart “pressed” towards Center Front, and cut along the waist cut line. As you open the paper, you’ll see the dart intake is shaped so that it will fit neatly into the seam allowance once the dart is sewn and pressed.
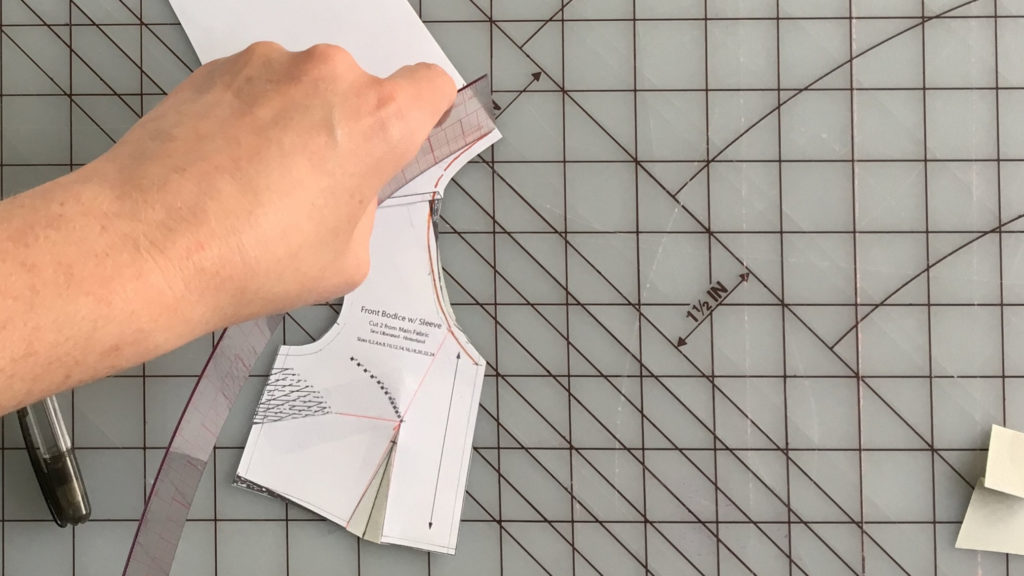
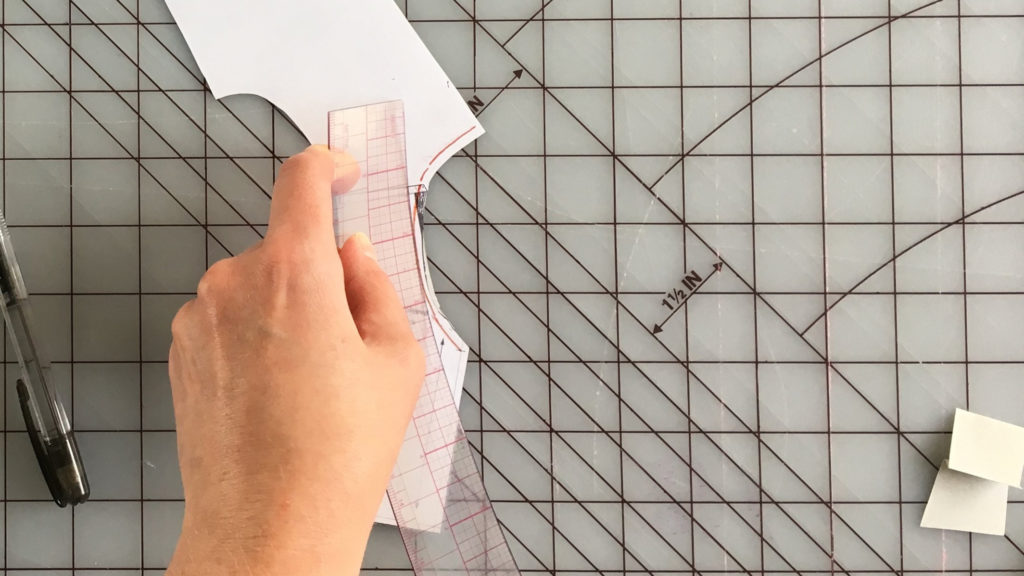
5. For the neckline finish, you’re going to be making a facing pattern. You can use the Neck Facing pattern as a starting point, but you’ll need to re-measure the length. Placing your ruler on its edge so that you’re measuring the sewing line (NOT the cut edge of the pattern piece, and not the seam allowances at the shoulder), measure the front neckline and back neckline, and the seam allowance at the center front (CF.)
Double this measurement and subtract ½”. (This will keep the facings slightly smaller than the neckline, so you don’t have any unsightly stretching out of the facing). The measurement that you have now is what you’ll use as the finished length of the Neck Facing, so measure your pattern piece and add or subtract to make it the correct length, centering the measurement over the center back (CB) double notches on the pattern piece. Don’t trim that extra paper off the end yet!
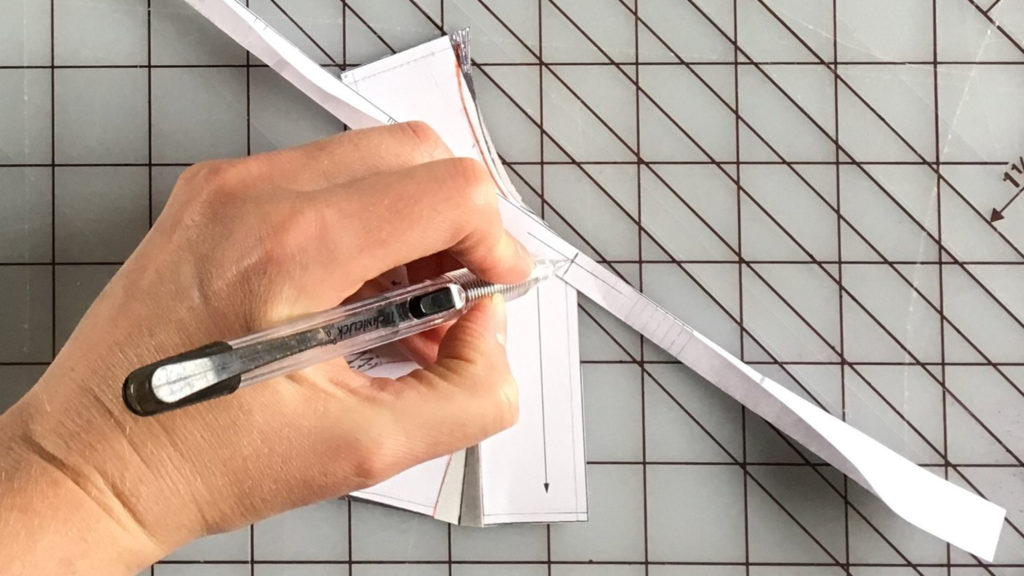
Now you’ll need to add a small triangle to account for the angle of the V-neck. Fold the facing in half lengthwise and place on top of the bodice so that the seam lines match at CF neck point.
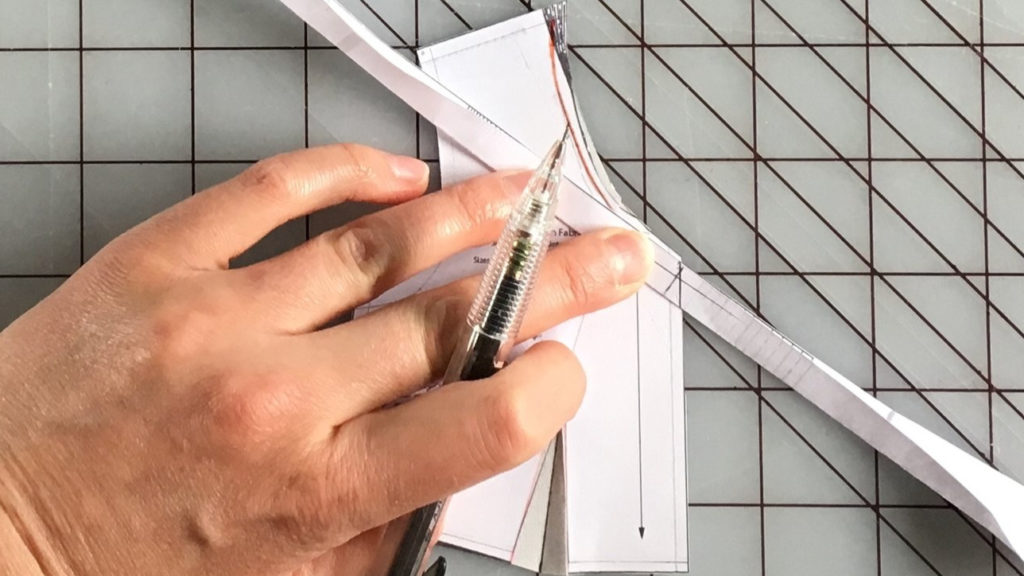
See how you need to add a triangle shape? This is your new cut line, for both ends of the facing.
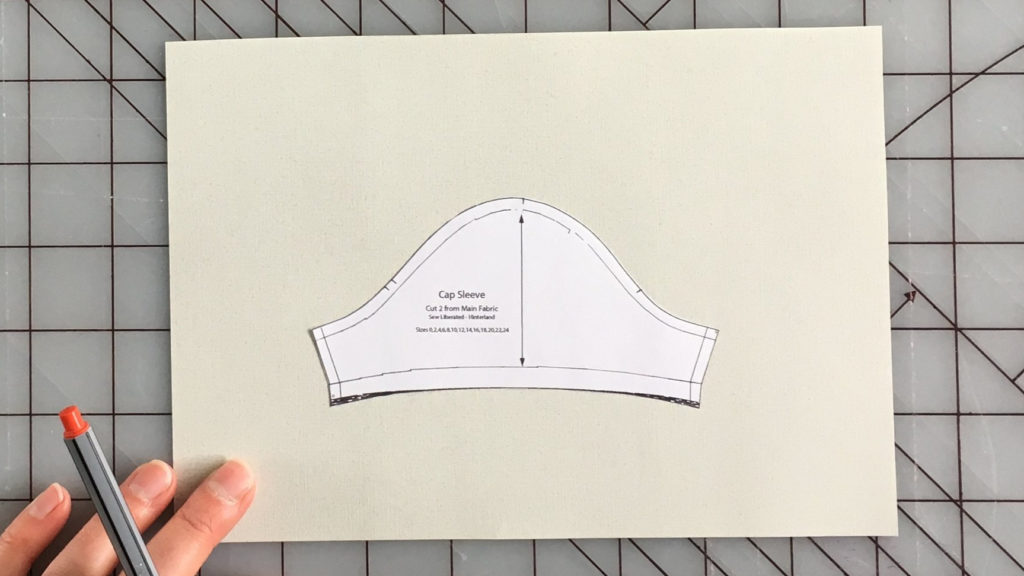
6. Set aside the Front and Back Bodices, and grab the Cap Sleeve pattern piece. You’ll need a piece of paper larger than the pattern piece ready, since we’re adding a bit to the sleeve hem circumference in this step.
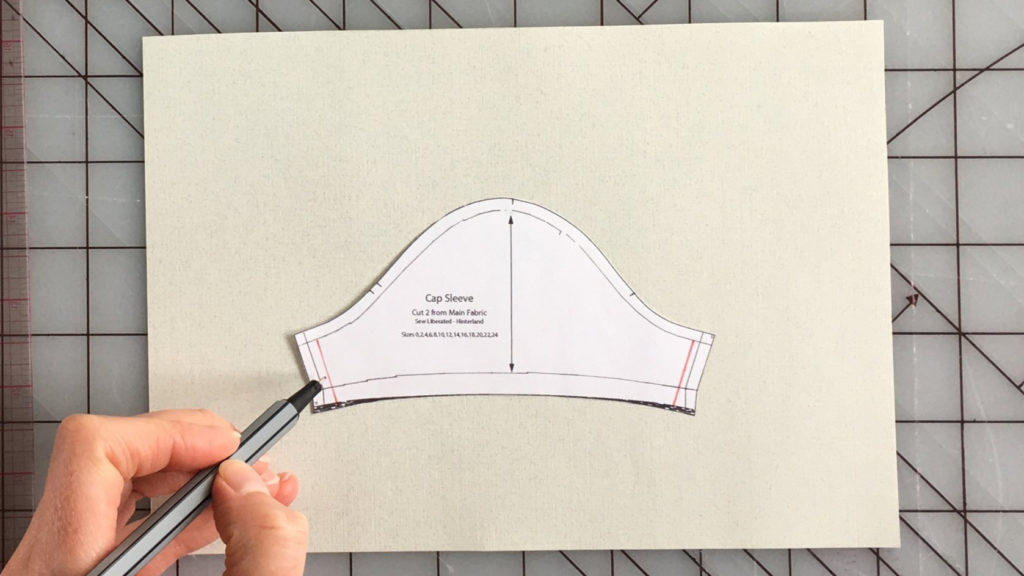
½” from the underarm seam, mark a line parallel to the underarm seam, on the front and the back of the sleeve. Cut along the line up to the armscye seam allowance, and into the seam allowance from the other side, leaving a hinge point on the seam line.
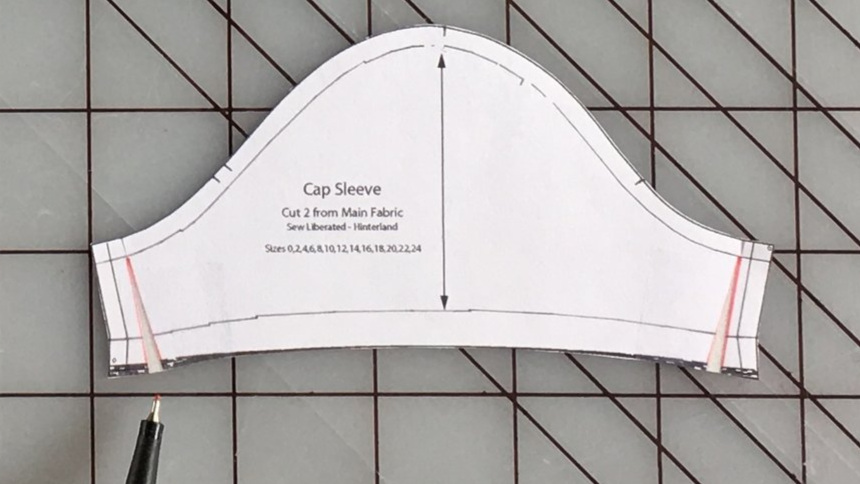
Spread this cut line open ¼”, and tape a small piece of pattern paper behind to secure. (Don’t tape it to the big piece of paper yet!)
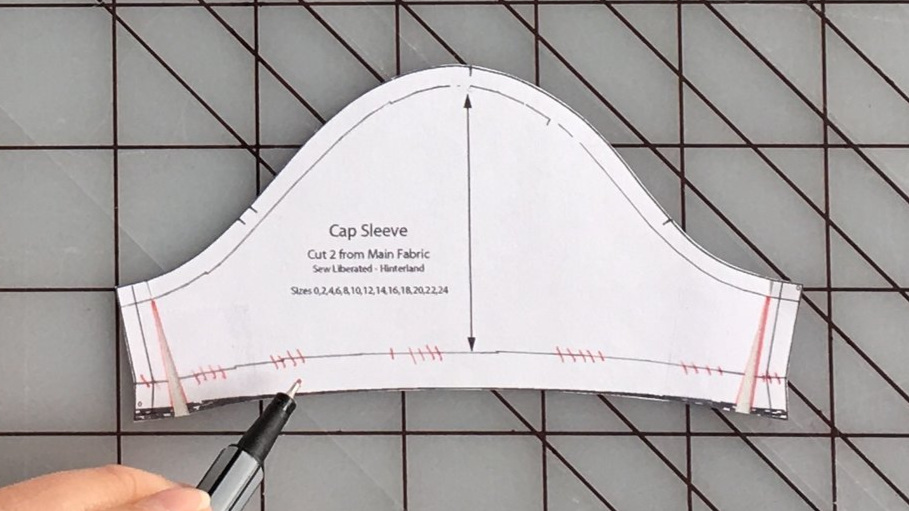
Lengthen the sleeve 1” (this gets you to the original cut line), and don’t add a seam allowance yet. (Note that you could lengthen more here if you’d like – just add some paper to the bottom. The sleeves were lengthened by 2” for the black dress in the photos.)
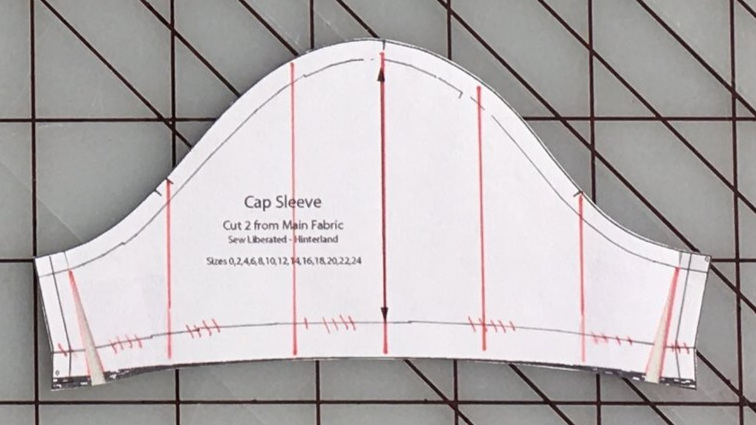
8. Parallel to the grainline, mark a line
- from the shoulder apex notch to the sleeve hem
- from the single notch on the front of the sleeve to the hem
- halfway between the front notch and the shoulder apex notch, to the hem
- from the top notch in the double notch to the hem
- halfway between the double notch and the shoulder apex to the hem
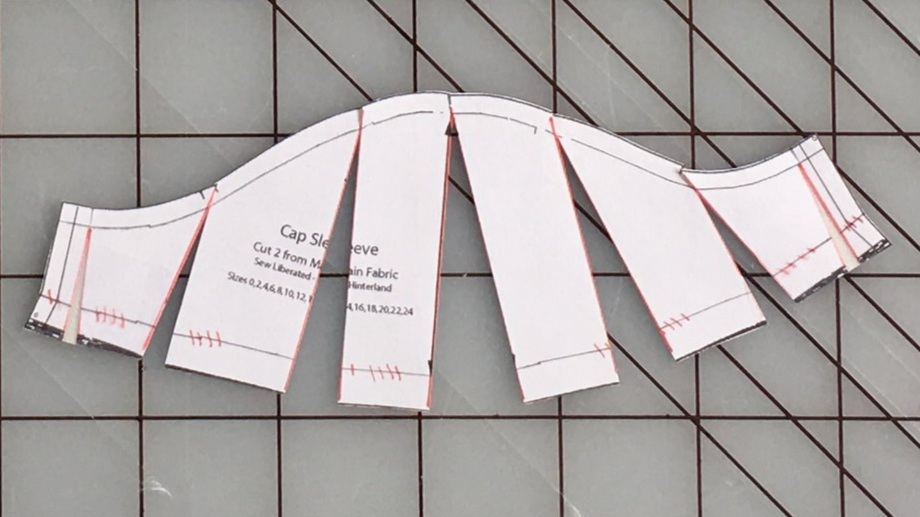
You now have 5 lines parallel to the grainline. Cut up each line from the hem to the seamline. Cut into the seam allowance to the seamline on each line, leaving a hinge point on the seamline.
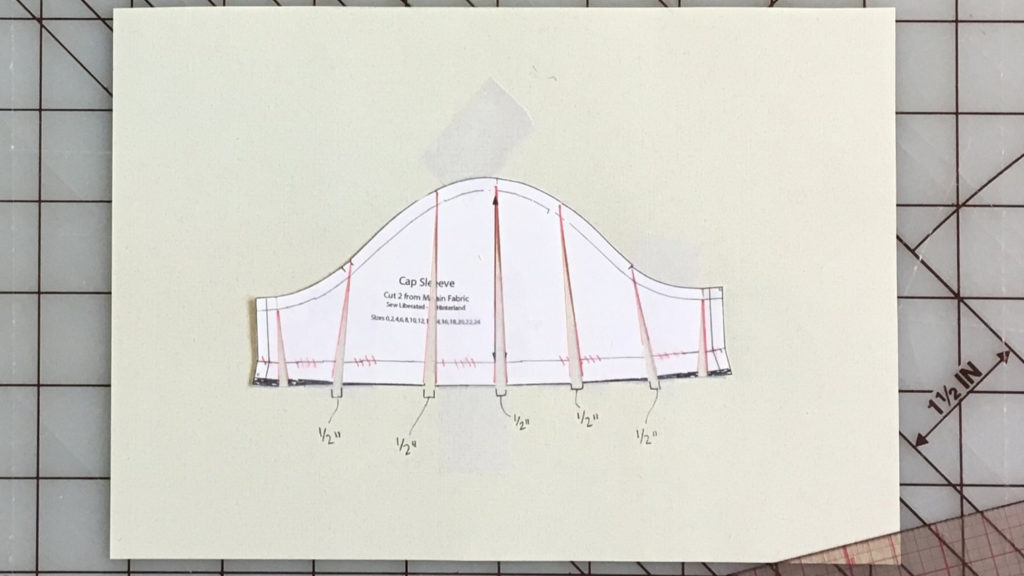
Carefully tape the section that has the grainline to your pattern paper. Spread each section apart ½”, at the hem, carefully keeping the hinge intact. Tape the sections in place. (This adds 2 ½” to the total hem measurement of the sleeve. If you want to spread more or less to change the flare of the sleeve, just be sure to distribute the measurements evenly).
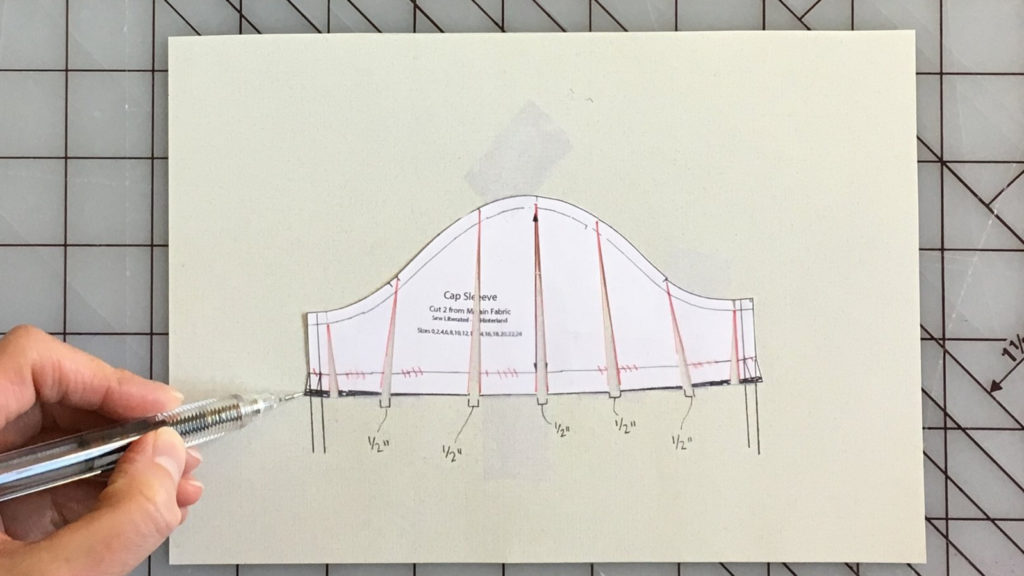
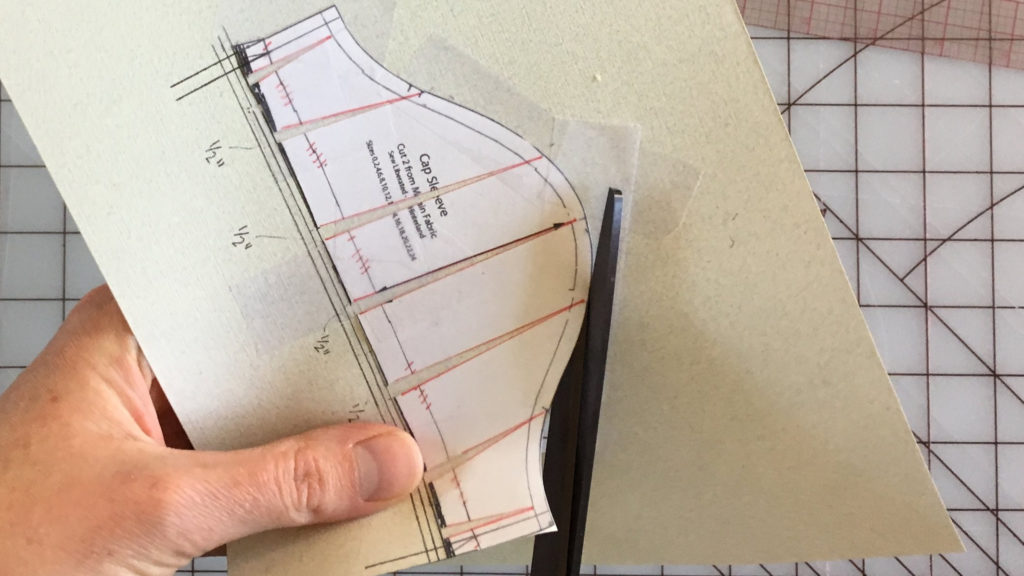
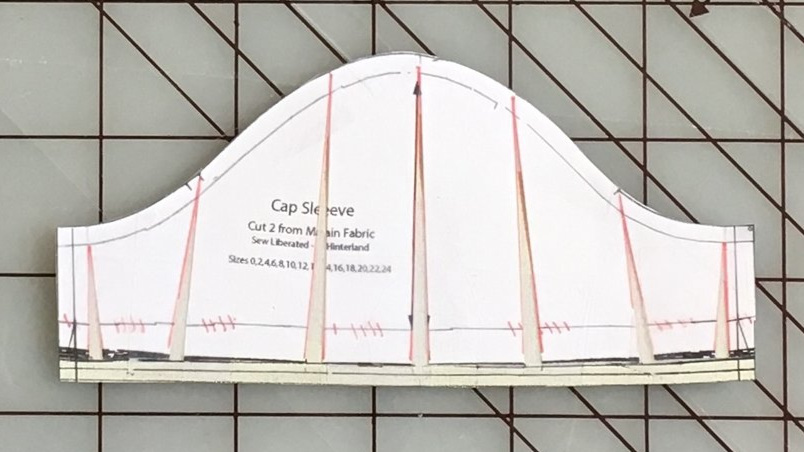
Straighten the underarm seams. Add a ¼” plus ¼” seam allowance along the hem edge for a turn and turn hem.
Smooth the Armscye seam, and the Sleeve is ready!
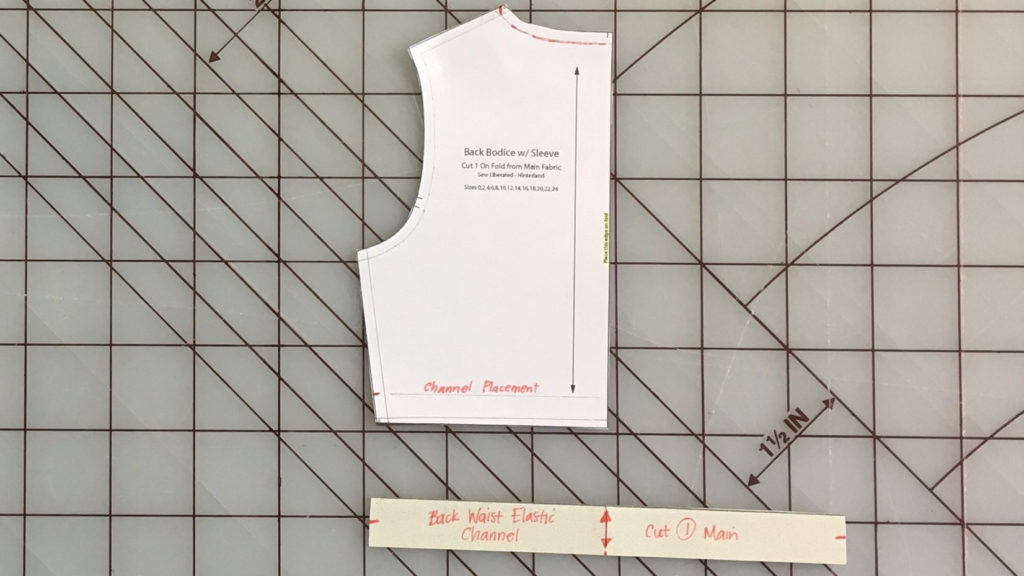
9. For the Back Waist Elastic channel, you’ll be making a new pattern piece. It will be 2 ¼” high (for ½” wide elastic), and as wide as the Back Bodice measures 1 ¼” above the waist seam. The grainline is the same as the Back Bodice. Your cut length for the back elastic is the width of the Back Bodice at waist less 3 ½”.
(If you want to use different elastic, the height of the piece will change according to the difference between your elastic and ½”. For example, if you use ¾” elastic, the Back Waist Elastic Channel will be 2 ¾” high.)
Sewing notes
You can follow the instructions as written for a Full Front Placket, with the following exceptions:
Before Step 1
Staystitch the neckline and armhole edges.
For the Back Waist Elastic Channel, fold the Channel in half lengthwise. Press well. Line up the bottom edge with the bottom edge of the WRONG SIDE of the Back bodice, right side of the Channel piece facing up, centers matching, and pin in place. Edgestitch along the folded edge to secure the Channel to the Back Bodice, sewing from the edge to the edge of the bodice. With a 7/16” (1 cm) seam allowance, stitch the channel to the Back Bodice at the waist. Feed the elastic through the channel and secure well in both side seam allowances. Now you can continue sewing with the Back Bodice as instructed.
In Step 2, you’ll be sewing waist darts instead of side darts. Sew as instructed, but press the dart intake towards the Center Front.
Skip Step 4
Step 6 is as written, though your facing should fit the neck almost exactly. You may pull the facing ever so slightly to ease the bodice to the facing length.
In Step 9, the sleeve hem allowance is a ¼” turn and turn hem. Sew ¼” from the edge of the sleeve, and use this line of stitching to turn the raw edge toward the wrong side ¼”. Fold under ¼” more, press well, and pin in place. Edgestitch along the folded edge to hem.
In Step 12b, when gathering the back of the skirt to fit the back bodice, make sure you gather the skirt to fit the back bodice when stretched out – in other words, the original width of the bodice before you added the elastic. When sewing the back skirt to the back bodice, you should work in sections and gently pull the elastic taut while sewing.
In Step 13c, when finishing the top edges of the plackets, mark a line that follows the diagonal edge of the neck facing, as shown above. Make sure your diagonal line is exactly mirrored (same angle and length) on the opposite placket. Sew along the line and trim the seam allowance, then continue with the instructions to finish your dress.
And … you’re done! Be sure to tag your creations with #hinterlanddress and #hinterlandhackathon!
We have two online courses all about the Hinterland Dress
Fit and Sew Bodices: The Hinterland is perfect for confident beginners to intermediate sewists looking to learn all about fitting a bodice and sewing a Hinterland Dress. This course takes your through every step of fitting and sewing your Hinterland.
The Creative Hinterland is a pattern making course for intermediate to advanced sewists. This course teaches you the skills you need to modify sewing patterns to your liking, bringing a spirit of playfulness to your sewing hobby and your closet. It includes 12 different hacks of the Hinterland Dress.


This is awesome. I’m making a Hinterland as written for a maternity dress this summer, but this is going on the list for after Baby comes. Perfect for celebrating (I hope) my returning shape, and nursing-friendly too. Thank you!
Thank you so much for this tutorial Meg! So excited to try this when I return from vacation. Hinterland might be the most versatile dress pattern in the history of dress patterns!
Would you be kind enough to clarify how to find “center” of new neckline in step 3 of this tutorial?
Is there any way you could post a photo of the “Before Step 1” instructions? My visual learner type brain is having trouble understanding that section.
Thanks!
I think I’m lost on the elastic measurements and placement. Is the channel being sewn on 1&1/4" from the edge of the back bodice? and is the channel 2x +2cm of the size of the elastic?
Hi Christina!
The channel = 2 x (width of elastic + 1/2" (1.2cm) waist seam allowance + 1/8" (3mm) for ease and edge stitching).
You’ll fold it in half lengthwise and line up the raw edges with the raw edges of the Back Bodice waist. The distance that you’ll sew from the raw edge depends on your elastic – you’re edge stitching the fold in place on the Back, and then stay-stitching the channel in the seam allowance to secure it.
I love this! Thank you so much. I have a question if you can help, I want to make a crop top using your other Hinterland hack post, but I would also like the v-neck from this post. Is the gaping in the neckline going to be noticeably bad if I don’t change the darts? Thank you in advance for any advice at all!
This will be so cute, Kiyo! You can follow step 3 to take in the neckline a bit, and then rather than re-locating the side dart, allow it to open slightly. This way you’ll reduce gaping at the neckline and keep the dart in its original location. If you need more detail, feel free to shoot me an email 🙂
I have the same question as Laura below … how to find the center of the new neckline? This dress is THE PERFECT dress and I’m excited to have multiple in my wardrobe!
Thank you for this detailed blog showing the step by step process to drafting your changes. It’s so helpful to see the process the way that you took photos of the process. I now have the confidence to try it instead of just ‘winging it’ and hoping the fit will be what I want! I’m so glad that I’ve discovered your blog!
Thank you! We are so glad you found the tutorial helpful.