How to fit the Sylvan Jacket
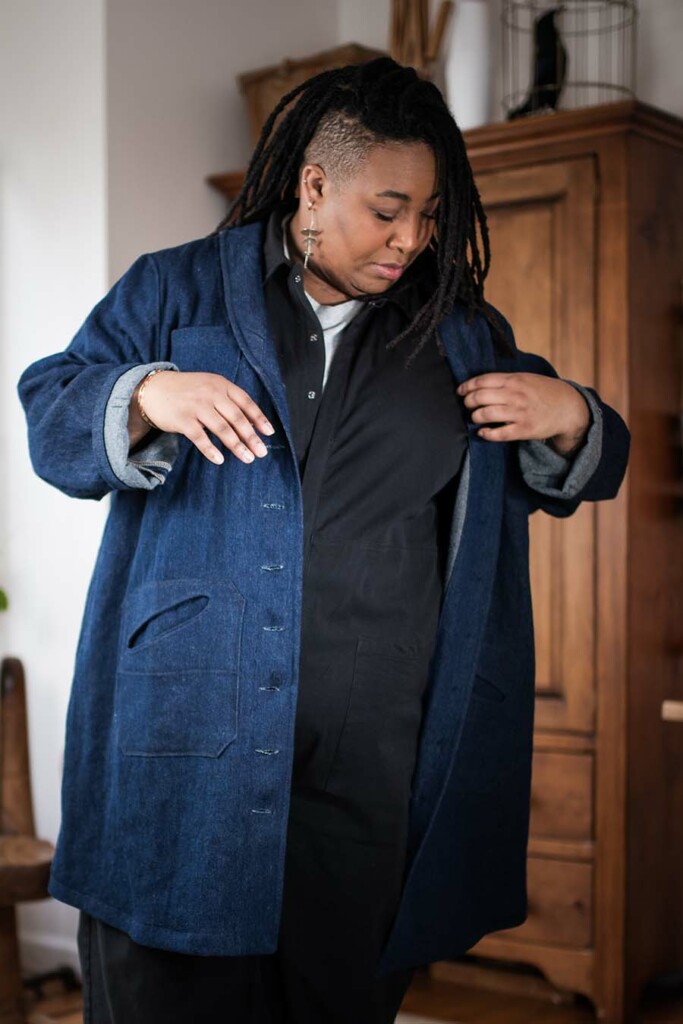


The Sylvan jacket has a relaxed and accommodating fit that proves versatile for a wide variety of bodies. The waist is marked on the pattern to support your fit adjustments if needed, and optional button tabs at the wrists and waist allow for a customizable fit.
Of course, a series of sizes is a starting point and you might need to make some fit adjustments to customize your Sylvan jacket to fit your unique shape, and that’s okay! Because it’s a more relaxed fit, the changes that I’ll walk through in this post aren’t as extensive as they could be in a more fitted garment, so that can take the edge off if you’re feeling nervous about personal fit adjustments.
And before we get started, I think you know what I’m going to say… it is a good idea to make a muslin to check your fit and practice the sewing steps before you cut into your precious final fabric! You don’t have to do the edge finishes or make everything perfect, but it can save many tears if you know in advance that your jacket will fit.
FBA: Full Bust Adjustment
Our testers found that the gentle fit through the shoulders was quite accommodating of a variety of bust sizes and shapes, so if you typically do a smaller FBA, you might not need to in this style. Some indicators of the need for an FBA are insufficient circumference around the full bust when the rest of the size fits well, gaping at the front neckline combined with pulling in the front armscye, and side seams tipping towards the front at the waist and hip.
(One tester actually found that a swayback alteration was an excellent alternative to an FBA and provided a dartless solution to wanting a longer font and shorter back. It restored the side seams to a vertical position, since that was her most significant fit issue. Worth considering before you start making big changes!)
To do an FBA on this jacket, you’ll need to mark your bust apex on the pattern piece first. You can use the measurement method, measuring down from the high point of the shoulder seam and out from the center front, or you can simply hold the pattern piece up to your body, and mark the apex directly. (The FBA is covered in great detail on the Hinterland Bodice in our Fitting Guide, so if the following steps leave you with questions, or you catch the fitting bug and want mooooorrrrre, go here to get the Fitting Guide.)
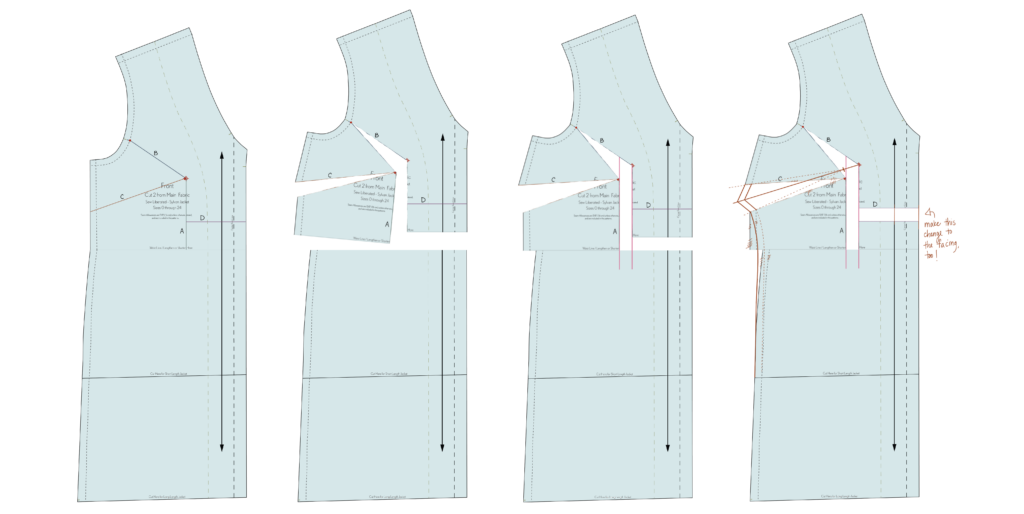
First, mark line A from apex to waist, parallel to the grainline. Mark line B from apex to the single notch in the armscye, and make a dot on the seam line (⅝” (1.6 cm) in from the cut edge for the hinge point). Mark line C from apex to the side seam at a slightly downwards angle (this will be your dart opening, and it looks nicer if it angles down a little). Mark line D from line A to the CF, below the apex level.
Cut along your lines, leaving hinge points of paper at the apex and the armscye seam allowance as shown with red dot in the diagram. Cut all the way across at the waist.
Mark two parallel lines on your added paper, set apart the distance of your adjustment. Tape the pattern piece down at the neck area, lining up the piece with the right line on your added paper. Align the bust apex with the left line, and pivot the lower side front to align with your line all the way down. As you align this piece, line C will open up into your new dart shape. Tape the pieces in place. Line up the lower middle front with the waist of the lower side front, allowing line D to open up in an even horizontal line. Tape in place.
To draw in the new dart, draw the center line of your new dart. Measure down the center line from the apex 1 to 2”, or 2.5 to 5 cm and mark the dart tip. Connect the dart tip to the edges of line C at the seam line, where it opened into the dart intake, and draw in the dart legs. Fold the paper as if the dart were sewn, and while it’s folded, cut along the side seam to create the dart intake shaping.
You’ll have a little (or less little) jog at the side seam where you rejoined the bodice at the waist. Blend that jog on the side seam between the lower leg of the dart and the hip. I wouldn’t recommend scooping the side seam shaping too much to avoid pulling and drag lines, and the style really does allow for the waist to be undefined so avoiding overfitting is okay!
Narrow Shoulder
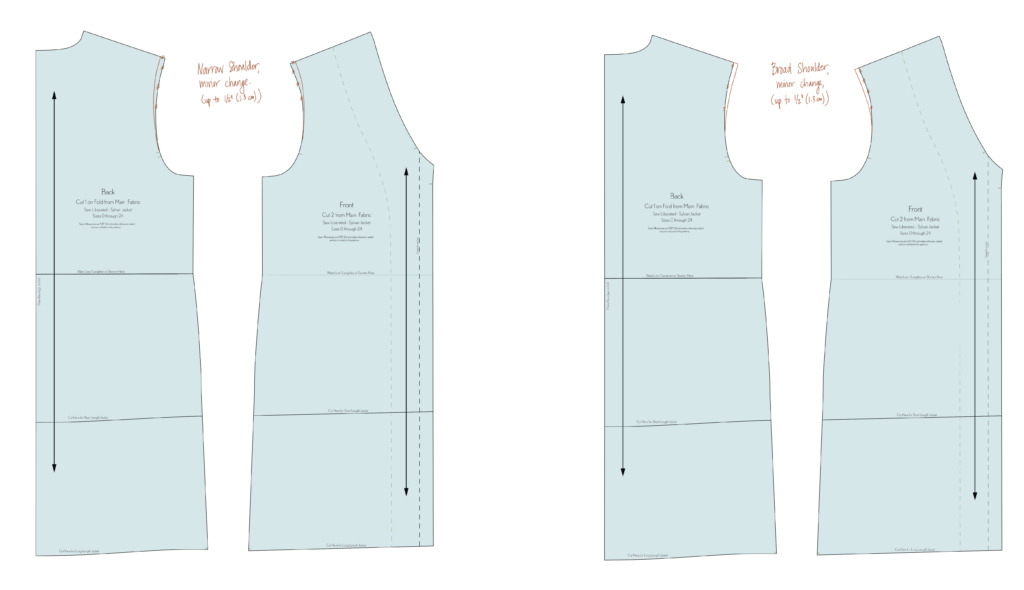
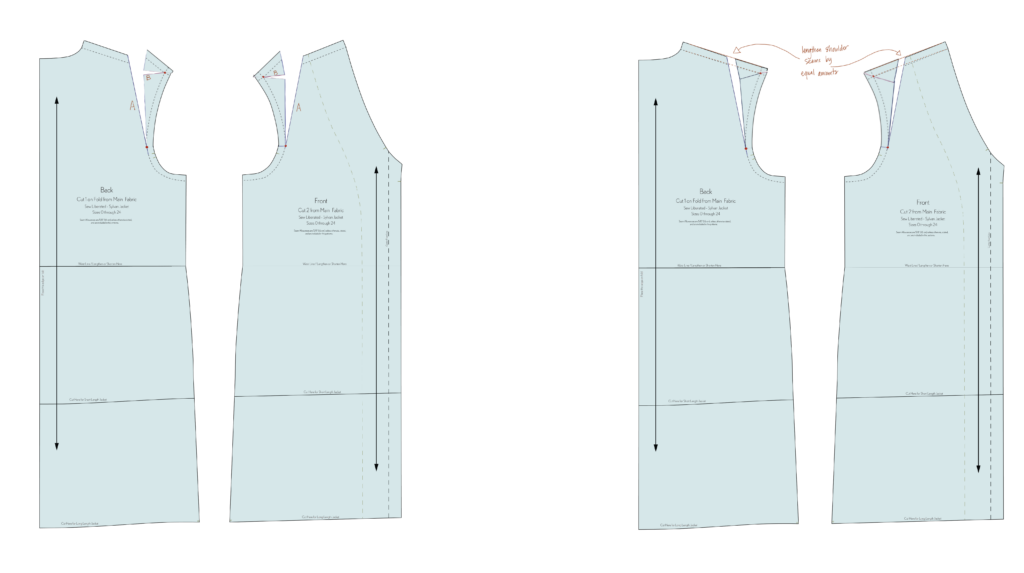
While the shoulder of the Sylvan Jacket is dropped and is intended to sit around ¾” to 1 ¼” from your actual shoulder, you may need to narrow the shoulders a little to suit your own proportions. Don’t over-fit this area if you don’t have to!
Here’s how to narrow the shoulder:
For a minor adjustment (of up to 1/2” (1.3 cm)), measure in from the end of the shoulder seam. Blend the shortened shoulder seam into the original seam line and cutting line using a gentle curve, not making any change to the armscye below the notches. You should be changing the front and back pieces by the same amount, and the armscye seam length should not change.
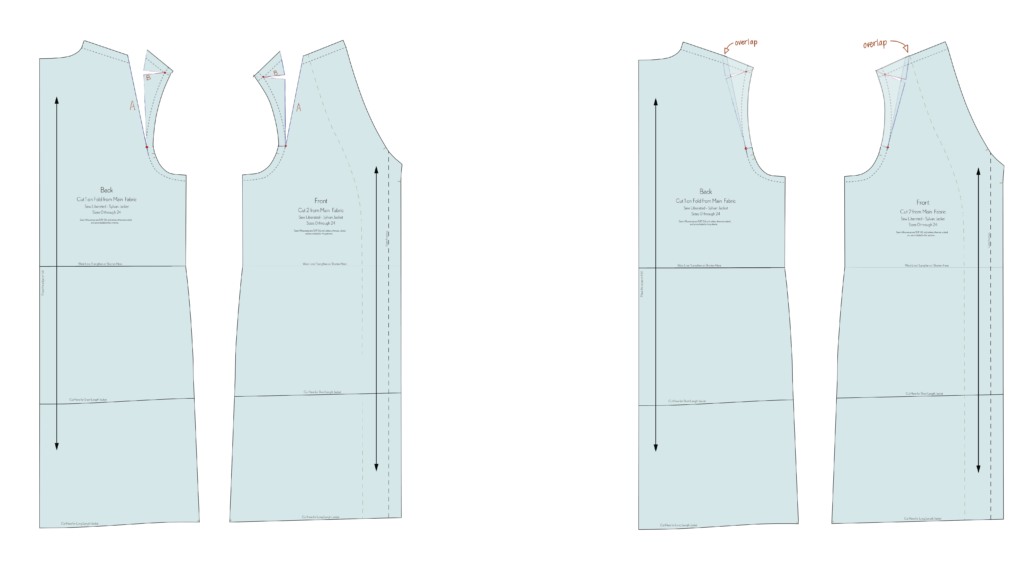
For an adjustment of greater than 1/2” (1.3 cm), you’ll approach the adjustment a little differently to maintain the balance of the garment and the armscye’s length (because you don’t want to change that seam length and then have a sleeve that doesn’t fit!). First draw in the seam lines through the armscye. It’s important that you make changes on the sewing line, not the cutting line! Draw Line A from about a third of the way up the shoulder seam to the notch in the armscye. Draw Line B squared off from Line A to the low point of the shoulder seam. Cut along Lines A and B, leaving hinges in the paper at the low point of the shoulder seam and the armscye, as shown with red dots in the diagram.
Maintaining the shoulder slope, overlap along the seam the required amount. The maximum amount for this change is 1 1/2” (3.8 cm). Add paper where needed and tape the pieces in place.
Broad Shoulder
In the same vein as the narrow shoulder, there’s a bit more leeway in the shoulder seam position if your shoulders are broader. But if you want to make changes, here’s how to broaden the shoulder:
For a minor adjustment (of up to 1/2” (1.3 cm)), measure out from the end of the shoulder seam. Blend the lengthened shoulder seam into the original seam line and cutting line using a gentle curve, not making any change to the armscye below the notches. You should be changing the front and back pieces by the same amount, and the armscye seam length should not change.
For an adjustment of greater than 1/2” (1.3 cm), first draw in the seam lines through the armscye. It’s important that you make changes on the sewing line, not the cutting line! Draw Line A from about a third of the way up the shoulder seam to the notch in the armscye. Draw Line B squared off from Line A to the low point of the shoulder seam. Cut along Lines A and B, leaving hinges in the paper at the low point of the shoulder seam and the armscye, as shown with red dots in the diagram.
Slide the outer shoulder outwards, away from the neckline, allowing the pattern pieces to open along the first cut line, and overlap along the second. Maintaining the shoulder slope, open along the shoulder seam the required amount. The maximum amount for this change is 1 1/2” (3.8 cm). Add paper where needed and tape the pieces in place.
Forward Shoulder
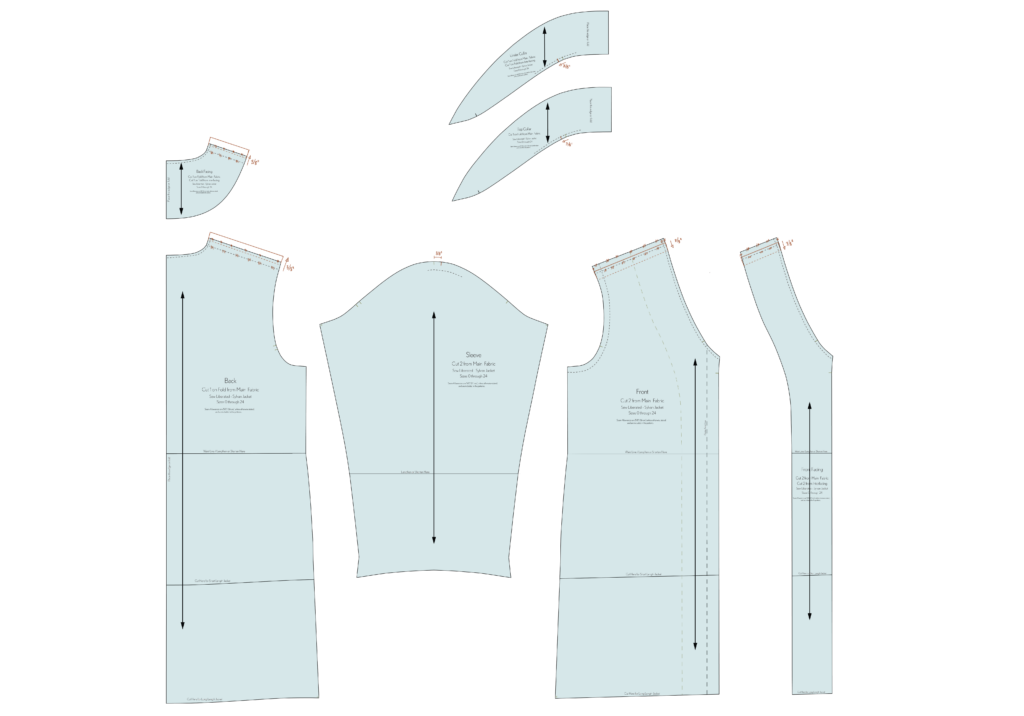
A forward shoulder adjustment is pretty straightforward (ha!), and you can read about it in detail on pages 38-40 of the Fitting Guide. The one additional detail in the Sylvan Jacket that you’ll need to pay attention to is the pattern pieces for the facings and collar. As you can see in the diagram, the shoulder seam notch on the collar and undercollar is moved forward the same amount as the change at the high point shoulder, and the shoulder seams on the facings match the changes made to the bodice. The diagram shows an even ⅜” (1 cm) shift forwards.
Blending Sizes
When choosing a size, take your measurements first. Even when you think you know your size, take them at the beginning of every project, and work from the charts. If your measurements are fitting into more than one size on the chart, take a look at how the sizes relate to each other. It’s easier to adjust the waist and hip than the bust and shoulders, so choose the size that works best for your upper body, and blend sizes in the waist and/or hip if needed. Use the Finished Measurements charts to help you decide by how much you want to blend your sizes. For an outer layer (since you probably want to be able to wear your jacket over a sweater), you’ll want about 6 -10” (15.5 cm – 25 cm) ease in the waist and hip. If, when you check the charts, you see that you need to blend in or out in the waist or hip, use a long, gently curving line. If you blend out for the waist, use that size for the hip as well.
Adding or Removing Body Length or Sleeve Length
The finished sleeve length is on the charts, but before making big changes, double-check your preferred length, and remember that the cap is slightly dropped, and you likely want enough length to cover your wrist with your arms extended. If you’re adding underlining, making sure the sleeve is long enough to turn back the cuff to show off your cute lining is also a fun option.
The jacket body comes in two lengths. The waist level is marked on the pattern pieces, and the Regular length is approximately hip level, so you can add or remove length exactly where you need to refine it. The Long length lands approximately mid-thigh. If you’re envisioning a much longer jacket than that, be careful when you’re adding length to think about walking ease. Longer jackets need a walking vent, more circumference around the knee, or another way for you to be able to take a long step.


Thank you very much!!!!!
Do you have any advice for a small bust adjustment?
Because we don’t have fitting devices (darts or seams) on this relaxed jacket, you should be able to not worry about an SBA! If anything, removing some front length in the muslin stage is an option. If you’d like to talk through this in more detail, feel free to email 🙂